Motion Functions
The Automation1 controller supplies move types and motion-related operations that can be combined to make a full program.
Initialize, Start, and Stop Your Axes
Use Enable(), Home(), Disable(), and Abort() to initialize, start, and stop your axes.
Enable
You must enable an axis or axes for motion to occur. When you enable an axis, you enable the amplifier power stage, and torque is applied to the motor.
Example: Determine if an Axis is Enabled
// Determine if the Enabled bit of the DriveStatus item is set on axis X.
var $isEnabled
$isEnabled = (StatusGetAxisItem(X, AxisStatusItem.DriveStatus, DriveStatus.Enabled) == DriveStatus.Enabled)
Use the Enable() function to enable one or more axes.
Enables the axis so that you can command motion.
Arguments
$axis The axis to enable.
Enables the axes so that you can command motion.
Arguments
$axes The axes to enable.
Home Motion
When you home an axis, that axis goes to its known hardware reference position. An axis is usually homed at the start of a program so that the axis is at a known location. When homing is complete, the position command value is set to the value of the HomePositionSet Parameter, which defaults to zero. The controller also disables program position offsets, work offsets, and offsets from interrupt motion mode.
When you home an axis with the Home() function, the process is done synchronously, which means that a task continues only after homing is complete. You can also home an axis asynchronously with the HomeAsync() function, which means that a task immediately continues and does not wait for homing to complete. Use the HomeType Parameter and HomeSetup Parameter to configure homing options. The ReverseMotionDirection Parameter does not have an effect on the HomeOffset Parameter or the home start direction.
Example: Determine if an Axis is Homed
// Determine if the Homed bit of the AxisStatus item is set on axis X.
var $isHomed
$isHomed = (StatusGetAxisItem(X, AxisStatusItem.AxisStatus, AxisStatus.Homed) == AxisStatus.Homed)
The Home() and HomeAsync() functions use the speed and ramp rate configured by the HomeSpeed Parameter and HomeRampRate Parameter. But, if the HomeRampRate parameter is set to 0, the controller uses an infinite value instead.
IMPORTANT: Use the Travel Limit Functions to move an axis into a hardware end-of-travel limit or a software limit. You can also use them to move an axis out of all the hardware end-of-travel limits and software limits. Aerotech recommends that you use the Travel Limit functions only for advanced troubleshooting and custom homing routines. Do not use this feature for other operations.
Performs a home cycle by moving the axis to a known hardware reference location. The task waits for completion of the home cycle.
Arguments
$axis The axis to home.
Performs a home cycle by moving the axes to a known hardware reference location. The task waits for completion of the home cycle.
Arguments
$axes The axes to home.
Performs a home cycle by moving the axis to a known hardware reference location. The controller performs the home cycle asynchronously so that the task moves on without waiting for completion.
Arguments
$axis The axis to home.
Performs a home cycle by moving the axes to a known hardware reference location. The controller performs the home cycle asynchronously so that the task moves on without waiting for completion.
Arguments
$axes The axes to home.
Disable
You can disable an enabled axis with the Disable() function. When you do this, you disable the amplifier power stage and stop torque from being applied to the motor.
A disabled axis can continue to move until you apply the brake. See the BrakeSetup Parameter topic for information on how to configure the brake.
IMPORTANT: If you set the bit for a fault condition in both the FaultMaskDisable Parameter and FaultMask Parameter, the controller automatically disables the axis when it generates the axis fault that you specify.
Disables the axis so that you cannot command motion.
Arguments
$axis The axis to disable.
Disables the axes so that you cannot command motion.
Arguments
$axes The axes to disable.
Abort
Use the Abort() function to safely stop motion on one or more axes. When you abort motion on an axis, the velocity of the axis is ramped down to zero and program execution does not continue.
If one or more of the specified axes are part of a coordinated move when you issue an abort function, the coordinated move and all of its axes will decelerate to zero, and the task executing motion will have an error. To abort an active move that the controller is waiting on to complete, you must abort motion with the Abort button in Studio, an Immediate Command, or another task.
If you issue an abort function on a follower axis that has a camming or gearing configuration, only the follower axis will abort, and the camming or gearing relationship will stop.
IMPORTANT: The abort deceleration rate depends on the type of motion. To find the abort deceleration rate when you use the Abort() function, refer to the AbortDecelRate Parameter.
IMPORTANT: When motion aborts on an axis, PSO operations fully stop unless PSO is in Data Collection Sync Pulse mode. This occurs if the abort is commanded or automatic. It is a safety feature.
Aborts motion on the specified axis. The controller stops all motion and ramps the axis to zero speed.
Arguments
$axis The axis to abort.
Aborts motion on the specified axes. The controller stops all motion and ramps the axes to zero speed.
Arguments
$axes The axes to abort.
Independent Axis Motion
Independent axis moves start on one or more axes, but each axis moves independently and can get to its endpoint at different times.
Absolute Motion
Absolute motion makes a simple, asynchronous point-to-point move to an absolute target position on an axis. Use the MoveAbsolute() function to execute absolute moves. Because this is an asynchronous move, the controller immediately goes to the next line of the program and does not wait for the absolute move to finish. With absolute motion, you must specify velocities for each axis.
Use the MoveAbsolute() function to execute an absolute move on one or more axes.
The MoveAbsolute() function uses the ramp rates configured by the DefaultAxisRampRate Parameter or DefaultAxisRampTime Parameter after a controller reset. Use the SetupAxisRamp*() functions to change ramping behavior, which take effect when the next move starts. Refer to Axis and Coordinated Ramping for more information.
Executes an asynchronous point-to-point move to an absolute target-position on an axis.
Arguments
$axis The axis on which to perform point-to-point motion.
$position The absolute target-position of the move.
$speed The speed at which to move the specified axis.
Executes an asynchronous point-to-point move to an absolute target-position on the specified axes.
Arguments
$axes The axes on which to perform point-to-point motion.
$positions The absolute target-positions of the move.
$speeds The speeds at which to move the specified axes.
Incremental Motion
Incremental motion makes a simple, asynchronous point-to-point move by an incremental distance on an axis. Use the MoveIncremental() function to execute incremental moves. Because this move is asynchronous, the controller immediately moves to the next line of the program and does not wait for the incremental move to finish. You must specify the individual velocities for each axis.
The MoveIncremental() function uses the ramp rates configured the DefaultAxisRampRate Parameter or DefaultAxisRampTime Parameter after a controller reset. Use the SetupAxisRamp*() functions to change ramping behavior, which take effect when the next move starts. Refer to Axis and Coordinated Ramping for more information.
Executes an asynchronous point-to-point move by an incremental distance on an axis.
Arguments
$axis The axis on which to perform point-to-point motion.
$distance The distance and direction to move the specified axis relative to the current position. A distance of zero results in no motion.
$speed The speed at which to move the specified axis.
Executes an asynchronous point-to-point move by an incremental distance on the specified axes.
Arguments
$axes The axes on which to perform point-to-point motion.
$distances The distances and directions to move the specified axes relative to the current positions. A distance of zero results in no motion.
$speeds The speeds at which to move the specified axes.
Freerun Motion
Freerun motion is when an axis or axes move indefinitely at a specified velocity. Use the MoveFreerun() function to execute freerun moves. As with the MoveAbsolute() and MoveIncremental() functions, the controller immediately moves to the next line of the program and does not wait for the freerun move to finish.
The arithmetic sign (positive or negative) of the provided velocity determines the direction of motion. If you specify zero velocity, the axis will not move, but the axis is considered to be in motion. You can issue a new freerun on an axis that is already freerunning. This causes the velocity of the axis to ramp up or down to the newly-specified velocity.
Use the MoveFreerun() and MoveFreerunStop() functions to start or stop a freerun.
The MoveFreerun() and MoveFreerunStop() functions use the ramp rates configured by the DefaultAxisRampRate Parameter or DefaultAxisRampTime Parameter after a controller reset. Use the SetupAxisRamp*() functions to change ramping behavior, which take effect when the next move starts. Refer to Axis and Coordinated Ramping for more information.
Executes an asynchronous freerun move on an axis. The axis will move indefinitely at the specified velocity.
Arguments
$axis The axis on which to perform freerun motion.
$velocity The velocity at which to move the specified axis. The sign of the velocity specifies the direction of motion.
Executes an asynchronous freerun move on the specified axes. The axes will move indefinitely at the specified velocity.
Arguments
$axes The axes on which to perform freerun motion.
$velocities The velocities at which to move the specified axes. The signs of the velocities specify the directions of motion.
Stops an asynchronous freerun move on an axis. The axis velocity decelerates to zero.
Arguments
$axis The axis on which to stop freerun motion.
Stops an asynchronous freerun move on the specified axes. The axis velocities decelerate to zero.
Arguments
$axes The axes on which to stop freerun motion.
Rapid Motion
Rapid motion is point-to-point motion that occurs on one or more axes where the axes move at their own speeds and get to their endpoints at different times. Use the MoveRapid() function or the G0 command to execute rapid motion. Refer to G0 Command: Rapid, Point-to-Point Motion for more information about the G0 command.
With rapid motion, the program only continues when all of the axes of the rapid move are at their endpoints. If axis coordination is not necessary, use rapid motion to move axes to an initial or intermediate position before issuing coordinated moves such as MoveLinear(), MoveCw(), or MoveCcw().
The MoveRapid() function uses the ramp rates configured by the DefaultAxisRampRate Parameter or the DefaultAxisRampTime Parameter after a controller reset. Use the SetupAxisSpeed() and SetupAxisRamp*() functions to change ramping behavior, which take effect when the next move starts. Refer to Axis and Coordinated Speeds and Axis and Coordinated Ramping for more information.
Executes a point-to-point rapid move on an axis.
Arguments
$axis The axis on which to perform the point-to-point rapid motion.
$distance The end point of the rapid move.
Executes a point-to-point rapid move on the specified axes.
Arguments
$axes The axes on which to perform the point-to-point rapid motion.
$distances The end points of the rapid move.
Executes a point-to-point rapid move on an axis.
Arguments
$axis The axis on which to perform the point-to-point rapid motion.
$distance The end point of the rapid move.
$speed The speed at which to move the axis.
Executes a point-to-point rapid move on the specified axes.
Arguments
$axes The axes on which to perform point-to-point rapid motion.
$distances The end points of the rapid move.
$speeds The speeds at which to move each of the axes.
Coordinated Motion
Coordinated moves start on one or more axes and follow a defined path in vector space to get to the endpoint at the same time. The controller uses the coordinated speed as the maximum vector speed and adjusts each axis velocity to get to the vector speed. When you create a part program, use coordinated motion. When it is not necessary to coordinate motion on multiple axes, such as before or between parts in your part program, you can use Rapid Motion.
During coordinated motion, the controller continues program execution after the coordinated move is finished, unless lookahead is active. See Velocity Blending Functions for more information.
Linear Motion
Linear motion makes a straight line in vector space for one or more axes where all specified axes start and stop motion at the same time. If more than one axis is specified, the order of the specified distances should match the order of the specified axes. Use the MoveLinear() function or the G1 command to execute linear motion. Refer G1 Command: Coordinated Linear Motion to for more information about the G1 command.
The distances specified to a linear move obey the target mode of the task. If incremental mode is active, motion occurs relative to the starting point of the move. If absolute mode is active, motion occurs relative to the origin position. See the Motion Setup Functions topic for more information on configuring the task target mode.
If you specify a linear move with a dominant axis, the controller uses the dominant coordinated speed and ramp rate set for all the axes in the move. If you only specify dependent axes in the move, the controller uses the dependent coordinated speed and ramp rate. For more information, refer to the AxisType Parameter page.
If you are using one or more dominant axes, the MoveLinear() function uses the speed and ramp rates configured by the DefaultCoordinatedSpeed Parameter and the DefaultCoordinatedRampRate Parameter / DefaultCoordinatedRampTime Parameter after a controller reset. Use the SetupCoordinatedSpeed() and SetupCoordinatedRamp*() functions to change speed and ramping behavior which take effect when the next move starts. Refer to Axis and Coordinated Speeds and Axis and Coordinated Ramping for more information.
If you are not using a dominant axis, the MoveLinear() function uses the speed and ramp rate configured by the DefaultDependentCoordinatedSpeed Parameter and the DefaultDependentCoordinatedRampRate Parameter.
Executes a coordinated linear move on the specified axis. A linear move creates a line in vector space on one or more axes.
Arguments
$axis The axis on which to perform linear motion.
$distance The end point of the linear move.
Executes a coordinated linear move on the specified axes. A linear move creates a line in vector space on one or more axes.
Arguments
$axes The axes on which to perform linear motion.
$distances The end points of the linear move.
Executes a coordinated linear move on the specified axis. A linear move creates a line in vector space on one or more axes.
Arguments
$axis The axis on which to perform linear motion.
$distance The end point of the linear move.
$coordinatedSpeed The speed of the coordinated linear motion.
Executes a coordinated linear move on the specified axes. A linear move creates a line in vector space on one or more axes.
Arguments
$axes The axes on which to perform linear motion.
$distances The end points of the linear move.
$coordinatedSpeed The speed of the coordinated linear motion.
Circular Arc Motion
Circular arc motion uses two axes to make a clockwise or counterclockwise circular arc in vector space. Use the MoveCw() function or the G2 command to move in a clockwise circular arc, and use the MoveCcw() function or the G3 command to move in a counterclockwise circular arc. Refer to Coordinated Arc Motion G-Code Programming for more information about the G2 and G3 commands.
The controller uses the coordinated speed as the maximum vector speed around the arc. See Axis and Coordinated Speeds for information on how to set the coordinated speed. Refer to DefaultCoordinatedCircularAccelLimit Parameter for information on how to limit acceleration during curved motion. Arc moves must be made on dominant axes. Use the AxisType Parameter to configure dominant axes.
An arc can be specified in many ways using combinations of radius, center point, and endpoint distances.
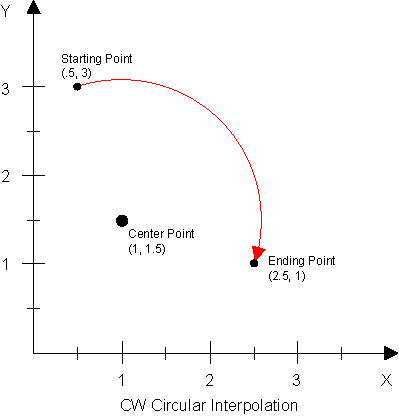
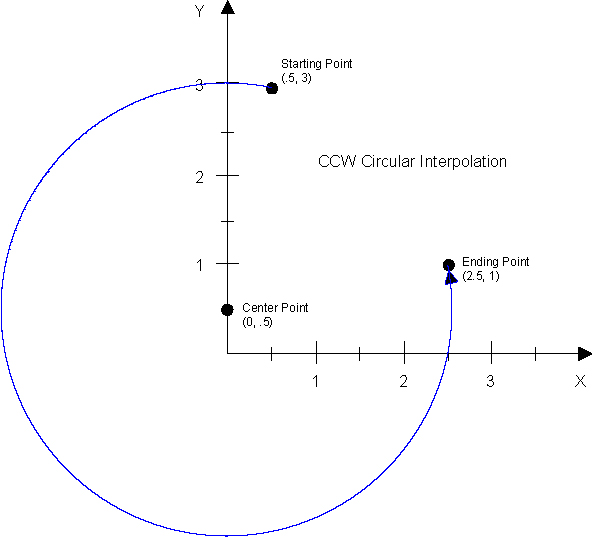
Make an Arc by its Center Point
To make an arc by its center point, specify the incremental offsets from the starting point of the arc to its center point, and specify the end point of the arc. This makes an arc with a radius that is the vector distance from the starting point to the specified center point. When you are making an arc by its center point, take note of the points that follow:
-
To make a full circle, the endpoints of the arc should be the same as the starting points.
-
The offsets specified for the center point do not obey the distance mode of the task. They are always incremental, relative to the starting point of the move.
-
The distances specified for the endpoint obey the target mode of the task. If incremental mode is active, the distances are relative to the starting point of the move. If absolute mode is active, the distances are relative to the origin. See Task Targeting Modes on the Motion Setup Functions page for more information.
Use the MoveCw() or MoveCcw() functions with the $center argument or the IJK G-code method to make an arc by specifying its center point. Refer to Coordinated Arc Motion G-Code Programming for more information.
Executes a coordinated clockwise circular arc move on the specified axes. An arc move creates an arc in vector space using two axes.
Arguments
$axes The axes on which to perform clockwise circular motion.
$distances The end points of the circular arc.
$center The relative offsets of the center point from the starting positions of the axes.
$coordinatedSpeed The speed of the coordinated circular motion.
Executes a coordinated counterclockwise circular arc move on the specified axes. An arc move creates an arc in vector space using two axes.
Arguments
$axes The axes on which to perform counterclockwise circular motion.
$distances The end points of the circular arc.
$center The relative offsets of the center point from the starting positions of the axes.
$coordinatedSpeed The speed of the coordinated circular motion.
Make an Arc by Radius
To make an arc by radius, specify the radius of the arc and the endpoint of the arc. The controller uses the specified radius and endpoint to calculate the center of the arc.
When you make an arc by its radius, take note of the points that follow:
-
The arithmetic sign of the radius determines if the arc is greater or less than 180 degrees. If you specify a positive radius, the arc is always less than 180 degrees. If you specify a negative radius, the arc is always greater than 180 degrees.
-
Do not use the radius method to specify arcs that are near 180 degrees. This can cause errors when calculated the center point.
-
You cannot use the radius method to make a full circle.
-
The distances specified for the endpoint obey the target mode of the task. If incremental mode is active, the distances are relative to the starting point of the move. If absolute mode is active, the distances are relative to the origin. See Task Targeting Modes on the Motion Setup Functions page for more information.
Use the MoveCw() and MoveCcw() functions with the $radius argument or the R code G-code command method to make an arc by specifying the radius.
The MoveCw() and MoveCcw() functions use the speed and ramp rates configured by the DefaultCoordinatedSpeed Parameter and DefaultCoordinatedRampRate Parameter / DefaultCoordinatedRampTime Parameter after a controller reset. Use the SetupCoordinatedSpeed() and SetupCoordinatedRamp*() functions to change speed and ramping behavior, which take effect when the next move starts. Refer to Axis and Coordinated Speeds and Axis and Coordinated Ramping for more information.
IMPORTANT: To specify the absolute starting and ending angles of a circular arc move, you must use the PQR G-code command method. To specify only the ending angle, you must use the Q G-code command method with the IJK G-code command method. For more information, refer to Coordinated Arc Motion G-Code Programming .
Executes a coordinated clockwise circular arc move on the specified axes. An arc move creates an arc in vector space using two axes.
Arguments
$axes The axes on which to perform clockwise circular motion.
$distances The end points of the circular arc.
$radius The radius of the circular arc.
Executes a coordinated clockwise circular arc move on the specified axes. An arc move creates an arc in vector space using two axes.
Arguments
$axes The axes on which to perform clockwise circular motion.
$distances The end points of the circular arc.
$radius The radius of the circular arc.
$coordinatedSpeed The speed of the coordinated circular motion.
Executes a coordinated counterclockwise circular arc move on the specified axes. An arc move creates an arc in vector space using two axes.
Arguments
$axes The axes on which to perform counterclockwise circular motion.
$distances The end points of the circular arc.
$radius The radius of the circular arc.
$coordinatedSpeed The speed of the coordinated circular motion.
Helixes and Dual Circular Motion
Helix motion uses three axes to generate a clockwise or counterclockwise helix across and axis. For more information, refer to Helixes and Dual Circular Motion on the G-Code Commands page.
Dual circular motion uses four axes to generate two clockwise, two counterclockwise, or one clockwise and one counterclockwise arc at the same time. You can also make dual circular motion with a helix. For more information, refer to Helixes and Dual Circular Motion on the G-Code Commands page.
PVT and PT Motion
PVT and PT motion use user-supplied profile points to make arbitrary velocity and acceleration profiles. To do this, specify points in the profile by their position, velocity, and time interval (PVT) or by their position and time interval (PT) with the MovePvt() and MovePt() functions. These functions can make profiles for up to 32 axes on a PC-based controller or 12 axes on a drive-based controller.
PVT and PT moves are buffered and executed one after another, which is different than how other move types work. If the buffer is full, the controller waits on the line until buffer space is available.
P is the position that you want for the specified axis at the end of the time segment and is in user units. The specified position obeys the target mode of the task. If incremental mode is active, the positions are relative to the starting point of the move. If absolute mode is active, the positions are relative to the origin. Refer to the Motion Setup Functions topic for more information on how to configure the task target mode.
V is the velocity that you want for the specified axis at the end of the time segment and is in user units. If the velocity is an approximation and is not the true, mathematically computed velocity, the interpreted velocities will not be continuous between points.
T is the time interval of the duration of the specified move in milliseconds. You can specify a move duration that is more than a millisecond. If more than one point per millisecond is necessary, use one of the time intervals that follow:
-
PC-based controller support time intervals of 1/10, 1/20, 1/50, or 1/100 of a millisecond.
-
Drive-based controllers support time intervals of 1/10 or 1/20 of a millisecond.
IMPORTANT: If you specify move durations that are less than a millisecond, all PVT and PT moves in the sequence must use the same move duration.
Use the MovePvt() function to specify individual points using position, velocity, and time interval.
If the true, mathematically computed velocity is not available, you can specify individual points with only position and time interval using the MovePt() function. To do this, you must change the controller’s interpolation mode to 3-position / 1-velocity with the MotionInterpolationMode Parameter.
The MovePvt() and MovePt() functions do not use the speeds or ramp rates configured with Acceleration and Deceleration Ramping. Instead, the MovePvt() function uses the specified velocity, and the MovePt() function immediately generates velocity based off of the interpolated positions.
Specifies a single point in an arbitrary motion profile. The point contains the position and velocity of one or more axes and a time interval. You must call this function for each point in the motion profile.
Arguments
$axes The axes of the motion profile point.
$positions The positions of each axis at the end of the time interval.
$velocities The velocities, in user units per time base, at which each axis will be moving at the end of the time interval.
$time The total time interval of the motion profile point in milliseconds.
Specifies a single point in an arbitrary motion profile. The point contains the position of one or more axes and a time interval. You must call this function for each point in the motion profile.
Arguments
$axes The axes of the motion profile point.
$positions The positions of each axis at the end of the time interval.
$time The total time interval of the motion profile point in milliseconds.
Hold Motion and Program Execution
You can temporarily stop motion and program execution with the Dwell() and MoveDelay() functions.
Dwell
You can delay motion for a specified quantity of time specified in seconds with the Dwell() function or the G4 command. For coordinated moves, the Dwell() function delays for the specified number of seconds between the end of a move and the start of the next move. For the MoveFreerun(), MoveIncremental(), and MoveAbsolute() functions, the Dwell() function delays for the specified number of seconds between the start of a move and the start of the next move.
You can use Dwell() to delay parts of the program that are not moves. The Dwell() function lets the task give time to other controller operations during the delay.
Dwell time is specified in seconds and has a resolution of 0.001 seconds or 1 millisecond. The specified dwell time must be greater than or equal to zero.
Use the Dwell() function to delay motion and program execution.
Suspends the execution of the task for a specified quantity of time.
Arguments
$dwellTime The quantity of time to suspend the task, in seconds.
Delay Motion
The controller lets you delay motion for a specified quantity of time with the MoveDelay() function. The quantity of time that you specify is rounded to the nearest time interval of the MotionUpdateRate Parameter. The axes stay at zero velocity during this command. To set the time resolution of the MoveDelay() function, set the MotionUpdateRate Parameter to 1 kHz or more.
You can put delays between MoveRapid(), MoveLinear(), MoveCw(), and MoveCcw() moves. You can do this if you want the axes to have time to stabilize between moves. If you are using a laser and set the output of the laser with the LaserOutputSet() function, you can issue the MoveDelay() function between laser outputs to control the laser at rates up to 20 kHz for servo drives and 100 kHz for galvo drives.
The MoveDelay() function is similar to Dwell(), but some differences include:
-
With
MoveDelay(), you must specify one or more axes that will not move during the delay time. -
MoveDelay()lets you command accurate motion delays when you set the MotionUpdateRate Parameter to more than 1 kHz. BecauseDwell()has a resolution of 1 millisecond, it might delay motion for a time that is different than you expect when MotionUpdateRate Parameter is set higher than 1 kHz. -
Dwell()is usually for when you want the task to give time to other controller operations for a specified quantity of time. BecauseMoveDelay()lets you command delays that are smaller than the task scheduling interval of 1 msec, it should not be used for when you want a task to give time to other controller operations.
To prevent delays between motion commands and the MoveDelay() function, use the WaitMove.Auto wait mode. For more information, refer to the Task Waiting Modes section of the Motion Setup Functions page.
Commands an axis to remain at zero velocity for a quantity of time.
Arguments
$axis The axis on which to perform the delay.
$delayTime Total delay time in milliseconds, rounded to the nearest time interval of the MotionUpdateRate parameter.
Commands axes to remain at zero velocity for a quantity of time.
Arguments
$axes The axes on which to perform the delay.
$delayTime Total delay time in milliseconds, rounded to the nearest time interval of the MotionUpdateRate parameter.
Wait for Motion
You can program the controller to wait until a move is complete before it continues to execute the program. Use this for moves such as MoveAbsolute() and MoveIncremental(), which do not cause the program to wait. For moves such as MoveRapid(), MoveLinear(), MoveCw(), and MoveCcw() in which the controller automatically waits for the move to complete, you do not need to use WaitFor*() functions.
You can change the waiting behavior for a task or for the whole controller. For more information, refer to Task Waiting Modes or the DefaultTaskWaitMode Parameter.
The controller finds if a move is complete with one of the two methods that follow:
- The
WaitForMotionDone()function waits for the commanded velocity to get to zero. You can see if an axis has a commanded velocity of zero with theAxisStatus.MotionDonebit in theAxisStatusItem.AxisStatusstatus item. - The
WaitForInPosition()function waits for the commanded velocity to get to zero and for the move before theWaitForInPosition()function to get to its specified position. The controller uses a position threshold specified by the InPositionDistance Parameter. The position must be within the given threshold for the amount of time specified by the InPositionTime Parameter before the "in position” condition is true. You can see if an axis is "in position" with theDriveStatus.InPositionbit in theAxisStatusItem.DriveStatusstatus item.
Use the WaitForMotionDone() and WaitForInPosition() functions that follow to wait for motion to be done.
If you want to see the status of motion completion and in position without waiting, use the example program that follows.
Program Example: Get Motion Status
var $isMotionDone
var $isInPosition
var $isMotionDoneAndInPosition

// Manually check the WaitForMotionDone() condition on axis X:
// - Check for the commanded velocity to get to zero.
$isMotionDone = (StatusGetAxisItem(X, AxisStatusItem.AxisStatus, AxisStatus.MotionDone) == AxisStatus.MotionDone)

// Manually check the WaitForInPosition() condition on axis X:
// - Check for the commanded velocity to get to zero.
// - Also check for the preceding move to get to its specified position by checking for in position.
$isInPosition = (StatusGetAxisItem(X, AxisStatusItem.DriveStatus, DriveStatus.InPosition) == DriveStatus.InPosition)
$isMotionDoneAndInPosition = $isMotionDone && $isInPosition
IMPORTANT: You can pause program execution and decelerate all axes to a stop with either Feedhold or Interrupt Motion, scale the programmed feedrate with MFO, override the spindle rotation speed with MSO, and execute motion and motion-synchronized function in reverse order with Retrace. For more information, refer to Advanced Task Control on the Task and Program Functions page.
Waits for motion to be done on the specified axis. The motion is done when the commanded velocity is at zero.
Arguments
$axis The axis on which to wait for motion to be done.
Waits for motion to be done on the specified axes. The motion is done when the commanded velocity is at zero.
Arguments
$axes The axes on which to wait for motion to be done.
Waits for motion to be done on the specified axis and for the axis to be in position. The motion is done when the commanded velocity is at zero. The axis is in position when the position error is at the threshold specified by the InPositionTime and InPositionDistance parameters.
Arguments
$axis The axis on which to wait for motion to be done and in position.
Waits for motion to be done on the specified axes and for the axes to be in position. The motion is done when the commanded velocity is at zero. The axes are in position when the position error is at the threshold specified by the InPositionTime and InPositionDistance parameters.
Arguments
$axes The axes on which to wait for motion to be done and in position.
Quick Reference of Motion Functions
The table in the drop-down that follows shows some of the properties of the different motion functions and related parameters.
Table: Summary of Automation1 Motion Functions
| Move | Coordinated | Waits for Move to Complete | Manual Feedrate Override (MFO) | Speed | Acceleration / Deceleration |
|---|---|---|---|---|---|
Home()
|
No | Yes | No | HomeSpeed Parameter |
BUT, if the HomeRampRate parameter is set to 0, the controller uses an infinite value. |
HomeAsync()
|
No | No | No | HomeSpeed Parameter |
BUT, if the HomeRampRate parameter is set to 0, the controller uses an infinite value. |
MoveAbsolute()
|
No | No |
No (Yes if you use |
Specified by arguments |
DefaultAxisRampRate Parameter OR DefaultAxisRampTime Parameter |
MoveIncremental()
|
No | No |
No (Yes if you use |
Specified by arguments |
DefaultAxisRampRate Parameter OR DefaultAxisRampTime Parameter AND
|
MoveFreerun()
|
No | No |
No (Yes if you use |
Specified by arguments |
DefaultAxisRampRate Parameter OR DefaultAxisRampTime Parameter AND
|
MoveRapid()
|
No | Yes | Yes |
AND
|
DefaultAxisRampRate Parameter
OR DefaultAxisRampTime Parameter AND
|
MoveLinear()
|
Yes | Yes | Yes | DefaultCoordinatedSpeed Parameter
AND
BUT, If only dependent axes are in the move, use DefaultCoordinatedSpeed Parameter AND
|
DefaultCoordinatedRampRate Parameter OR DefaultCoordinatedRampTime Parameter AND
AND
|
MoveCw()
|
Yes | Yes | Yes | DefaultCoordinatedSpeed Parameter
AND
|
DefaultCoordinatedRampRate Parameter OR DefaultCoordinatedRampTime Parameter AND
|
MoveCcw()
|
Yes | Yes | Yes | DefaultCoordinatedSpeed Parameter
AND
|
DefaultCoordinatedRampRate Parameter OR DefaultCoordinatedRampTime Parameter AND
|
MovePvt()
|
No | Points are buffered 1 msec at a time | No | Specified by arguments | Based off of commanded position and velocity |
MovePt()
|
No | Points are buffered 1 msec at a time | No | Based off of commanded position | Based off of commanded position |
MoveDelay()
|
Yes | Yes | No | N/A | N/A |


