2D Data Collection
Configure and collect 2D (two-dimensional) data signals in the Data Visualizer module. When you add data signals to the 2D configuration, they are automatically added to the 1D configuration. To use the condensed version of this module in the Develop workspace, see Data Visualizer Module. To use the larger version of this module in the Visualize workspace, see Visualize Workspace.
You can configure and collect 2D data only in the Data Visualizer module. But after data collection is configured, you can use the Application Data Collection Functions that follow to do some operations in AeroScript. They have the same functionality as some of the buttons in the Data Visualizer module:
- The Collect Snapshot button is equivalent to the
AppDataCollectionSnapshot()function. - The Collect Repeated Snapshots button is equivalent to calling the
AppDataCollectionSnapshot()function multiple times. - The Stop Collection button is equivalent to the
AppDataCollectionStop()function. - In the Configure Signals dialog, you can do different operations with the
AppDataCollectionConfigure()function.
- In Automation1 Studio, select the Visualize tab.
- On the Data Visualizer toolbar, click the Configure Signals link.
- In the Configure Signals dialog, select the 2D/3D tab.
- In the Choose an option to get started part of the dialog, click the Configure 2D Signal button.
- Follow the prompts to configure the X and Y components of the 2D signal and add it to your 2D signals.
- Click the Update button to save your changes and close the dialog.
IMPORTANT: You cannot use data collection rates of 100 kHz or greater when you are connected to a drive-based controller.
- In Automation1 Studio, select the Visualize tab.
- In the Data Visualizer toolbar, click the Configure Signals link.
- On the top-right part of the dialog, configure the items that follow:
- Use the Period (msec) drop-down box to select the data collection period.
- Use the Time to Collect text box to specify the quantity of time, in milliseconds, for which you collect data.
- Click the Update button to save your changes and close the dialog.
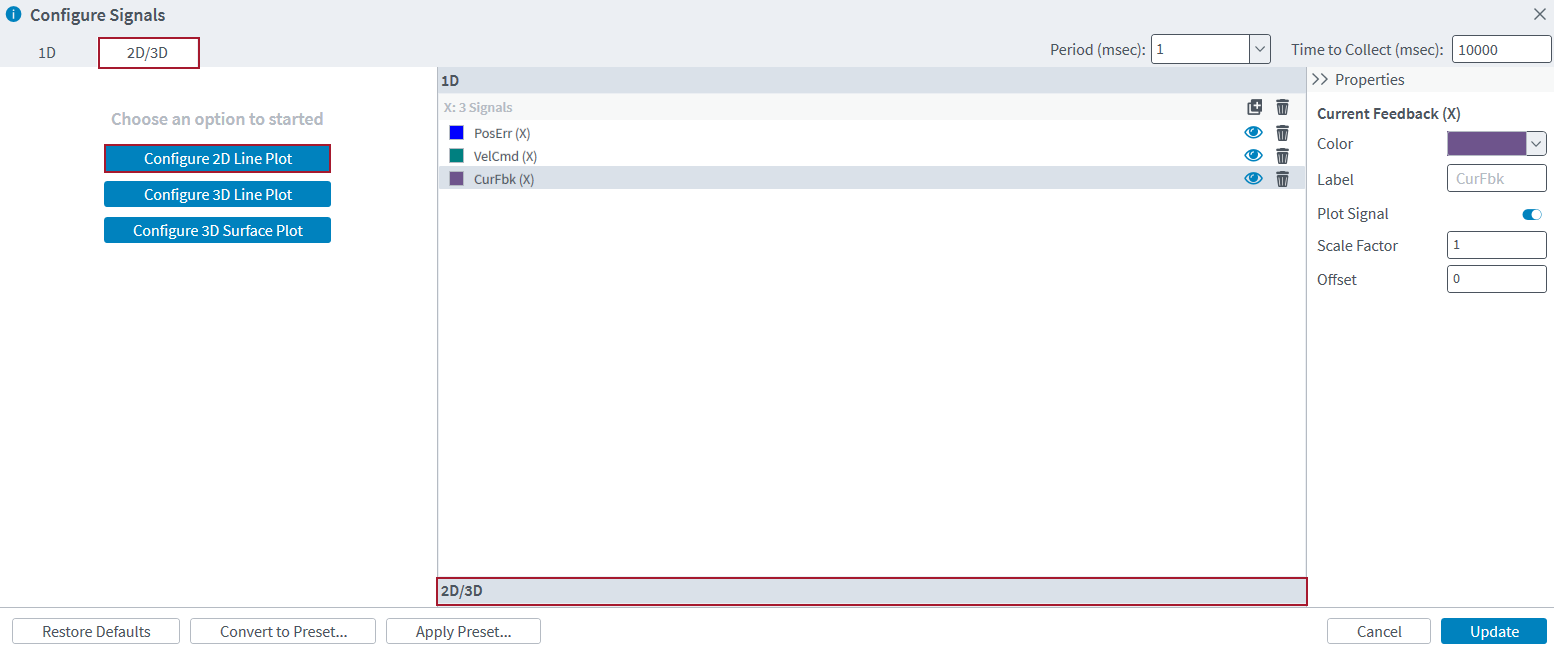
Configure Signals Dialog - 2D Signals
In the Configure Signals dialog, select the 2D/3D tab to configure data signals for 2D (two-dimensional) data collection. The application shows the configured data signals when you plot 2D data in the Data Visualizer module.
| Name | Type | Description |
|---|---|---|
|
2D/3D |
Tab |
Shows the buttons that you can use to configure 2D and 3D data signals. |
|
Button |
Configure 2D Line Plot - Lets you configure a new 2D line plot and add it to your data collection configuration. |
|
|
Button |
Configure 3D Line Plot - Lets you configure a new 3D line plot and add it to your data collection configuration. |
|
|
Button |
Configure 3D Surface Plot - Lets you configure a new 3D surface plot and add it to your data collection configuration. |
|
|
Period (msec) |
Drop-Down Box |
Configures the sampling period for data collection. |
|
Time to Collect (msec) |
Text Box |
Configures the quantity of time for which data is collected. |
|
Properties |
Column |
Shows the properties that you can change for each configured data signal. |
|
Drop-Down Box |
Color - Shows the data signal color. You can select a new signal color from the drop-down box. To make a signal color with specific RGB, HSL, or CMYK options, select the Color drop-down box. Then click Advanced. |
|
|
Text Box |
Label - Shows the name of the data signal. You can change it to a different name. |
|
|
Text Box |
Scale Factor - The value to multiplicatively apply to the collected data. If you specify a Scale Factor and an Offset, the Offset is applied before the Scale Factor. |
|
|
Text Box |
Offset - The value to add to the collected data. If you specify a Scale Factor and an Offset, the Offset is applied before the Scale Factor. |
|
|
Restore Defaults |
Button |
Changes the Configure Signals dialog back to its default settings. |
|
Convert to Preset... |
Button |
Converts your configured data signals into a data collection preset and saves it to the controller. IMPORTANT: The application will not add Industrial Ethernet signals to the preset. |
|
Apply Preset... |
Button |
Applies a data collection preset from the controller or a plot file. This replaces all of your configured data signals with those from the preset. |
|
Cancel |
Button |
Clears your unsaved changes from the Configure Signals dialog and asks you to confirm the action. |
|
Update |
Button |
Saves your current changes to the Configure Signals dialog and then closes it. |
More Reading
For more information about data collection, see the pages that follow:
Data Collection and Controller Status
Tells you about the differences between data signals and status items and what you can do with each type of collected information.
Use the Data Visualizer Module to Collect Data
Collect data in the Data Visualizer module.
Programmatically collect and write plot files to the controller file system from AeroScript.
Collect data with Signal Log, an AeroScript program or library, or the Automation1 APIs.
Sample times that you can specify for data collection rates.
Related status items that give you more information about data collection.
Tells you about the limitations of data collection and errors that can occur.


