Voltage Selection Operation
DANGER: Disconnect Mains power before opening chassis. Voltage selector settings must not be changed with Mains power applied to the unit.
DANGER: Wait at least ten (10) minutes after removing the power supply before performing maintenance or an inspection. Otherwise, there is the danger of electric shock.
WARNING: The voltage selector must be configured to match the AC line voltage and is factory-configured based on the options that you ordered. You could damage the unit if the voltage selector is set for the incorrect AC input voltage.
The voltage selector can only be used with transformer-derived bus voltages. This voltage selector function should not be changed when using off-line supplies. Damage to the unit may result if this function is used improperly.
If the user changes the voltage selector settings, it is also the user's responsibility to change the iXR3/XR3 AC power label located next to the AC inlet. Refer to the Electrical Specifications for power ratings.
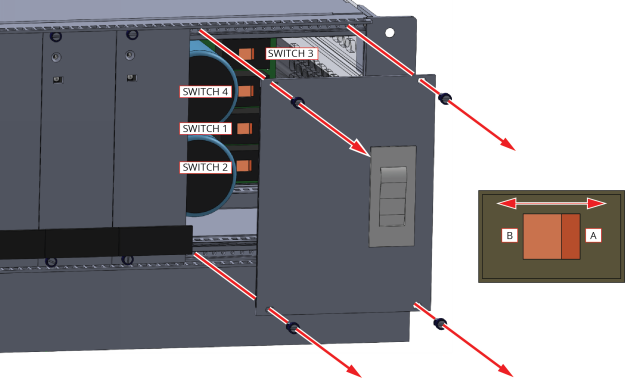
Procedure for setting AC voltage selector switches:
- Turn-off and disconnect all power from unit.
- Remove the four screws that secure the panel on the front of the iXR3/XR3
- Carefully remove the panel without pulling out the wiring connected to the Power Switch.
- Use AC Voltage Selector Switch Settings to set all of the voltage selector switches to the position indicated for the desired operating voltage.
WARNING: AC Voltage Selector Switch Settings applies to the Drive Interface Board with the P/N: EFN01746-01 (manual revision 1.00.00 and up). Customers with the Beta hardware and Beta manual revision should contact Aerotech for more information if you need to change voltage settings.
Table B-1: AC Voltage Selector Switch Settings
|
|
S1 | S2 | S3 | S4 |
|---|---|---|---|---|
| 100 VAC | A | B | A | B |
| 120 VAC | A | A | A | A |
| 200/208 VAC | B | B | B | B |
| 240 VAC | B | A | B | A |
Figure B-1: Voltage Selection Switch Access