Activate the Software
You can activate your Automation1 software license or change your license key online. If the computer with the installed software does not connect to the Internet, use the procedure to manually activate.
Activate the Automation1-MDK Software
When you open the Automation1 Studio application for the first time, you must activate the Automation1-MDK software. If the computer with the installed software connects to the Internet, enter your Automation1-MDK License Key and click the Activate Now button. If the computer with the installed software does not connect to the Internet, click the manual activation link. See the Manual Activation section in this topic for more information about how to manually activate your software.
Activate the Automation1-iSMC Software
The first time you use the Automation1 Studio application to connect to a controller, you must activate the Automation1-iSMC software. If you purchased integration from Aerotech and you are connecting to a drive-based controller or an Automation1-iPC, your Automation1-iSMC was already activated using your Automation1-iSMC License Key.
You must use Automation1-MDK to activate Automation1-iSMC. If the computer with the installed software connects to the Internet, enter your Automation1-iSMC License Key and click the Activate Now button. If the computer with the installed software does not connect to the Internet, click the manual activation link. Refer to the Manual Activation section of this page for more information about how to manually activate your software.
Changing your License Key
Use the Licensing module in Studio to change your license key for Automation1-MDK and Automation1-iSMC.
- Save all of your work before you start to make changes to the license key.
- In Studio, open the Configure workspace.
- In the Controller category, select Administration.
- In the Licensing module, click the Change Key button for the license key you want to change.
- Enter the new key and click Next. Then click Finish.
- A dialog to reset your controller comes into view. Click Yes to reset your controller. You must reset your controller for the license key to have an effect.
Tip: To see the keys in the Licensing module, click the Show Keys toggle in the upper right of the module.
Manual Activation
If the computer with the installed software does not connect to the Internet, click the manual activation link on the Activation dialog and use the procedure that follows to activate either Automation1-iSMC, Automation1-MDK, or both.
Step 1. Enter the license key.
- Enter the license key for the software that you want to activate.
Step 2. Create an Activation Request.
-
Click Create Activation Request.... The Save As dialog comes into view.
-
Type or browse to a network location or an external file-storage device where you can have access to the file from a computer that connects to the Internet. The default file name includes the name of the software product you are activating. You can change the name of the file, but the Activation Request file must have an .areq or .txt extension. Click Save.
If you cannot remove files from the area or cannot have access to the electronic file from a computer that connects to the Internet, you must record the contents of the file and then manually enter the information on the Software Activation website. Open the file in a text editor and record the content exactly as it is in the Activation Request file.
- Product
- Version
- Key
- Code 1
- Code 2
Step 3. Go to the Software Activation website.
You must use a computer that connects to the Internet to either upload the file or manually enter the information to the website.
-
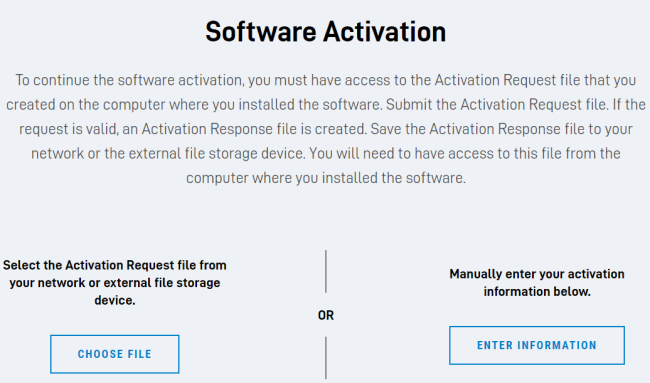
Open a Web browser and go to https://www.aerotech.com/resources-software-downloads-activation/. Scroll to the Software Activation section.
-
To upload the file from your network or external storage device, click Choose File. Then go to step C.
To manually enter the information to the website, click Enter Information. Then go to step D. -
In the Submit the Activation Request File dialog, click Choose File and type or browse to where you saved the Activation Request file. Select the file and click Open. The name of your activation file shows in the box adjacent to the Choose File button.
-
In the Enter In Activation Information dialog, enter the information and click Submit Activation Request. An Activation Response file is created. The name of the file is the same as the Activation Request file, but the extension is .ares.
-
Save the Activation Response file to a network location or an external storage device where you will have access to the file from the computer where you installed the software.
Step 4. Validate the Activation Response file.
-
Go to the computer where you installed the Automation1-MDK (you must use Automation1-MDK to activate Automation1-iSMC) software. If you saved the Activation Response file to an external file-storage device, take the file-storage device with you.
-
In the Manual License Activation dialog, click Validate Activation File.
-
Go to where you saved the Activation Response file. Select the file and click Open.
-
Activation is complete. Click Continue and start using your software.
Next Step: Performance Optimization


