About the Instrument Driver for LabVIEW™
You are reading Aerotech's API documentation for the Automation1 Instrument Driver for LabVIEW™. To view National Instruments™ official product documentation for the LabVIEW™ application, see LabVIEW Documentation.
Overview
LabVIEW™ is a trademark of National Instruments™. Neither Aerotech, nor any software programs, publications, or other goods or services offered by Aerotech, are affiliated with, endorsed by, or sponsored by National Instruments™.
The Automation1 Instrument Driver lets you use LabVIEW software to interact with an Automation1 controller. With the Instrument Driver, you can connect to a controller to get status, execute commands, run your process, and more.
Optional Purchase Necessary: To use the Automation1 Instrument Driver for LabVIEW™, you must purchase the LabVIEW MDK license (LV1). Contact your Aerotech sales representative to speak about your licensing needs. See the Contact Sales section of www.aerotech.com.
Throughout this documentation, the term Instrument Driver refers to the Automation1 Instrument Driver for LabVIEW™. The Instrument Driver was made by Aerotech and it uses the LabVIEW™ software. The term LabVIEW™ refers to the desktop application that was made by National Instruments™.
Supported Languages, Versions, and Operating Systems
The Automation1 Instrument Driver supports LabVIEW versions 2020 and newer. LabVIEW 32-bit and LabVIEW 64-bit are both supported.
LabVIEW Community Edition is not supported.
IMPORTANT: Aerotech and National Instruments™ recommend that you use LabVIEW 32-bit.
The operating systems that follow are supported:
- Windows 10 32-bit or Windows 11 32-bit
- Windows 10 64-bit or Windows 11 64-bit
Linux is not supported.
The Automation1 Instrument Driver for LabVIEW™ first became available for Windows in Automation1 version 2.2. For more information about API versioning, see the Automation1 APIs page.
Install and Access the Automation1 Instrument Driver
The Automation1 Instrument Driver is packaged with Automation1-MDK. To install the Instrument Driver for Automation1, run the Automation1LabVIEWInstaller.exe executable file in C:\Program Files\Aerotech\Automation1-MDK\Bin. The installer tells you how to go through the installation process.
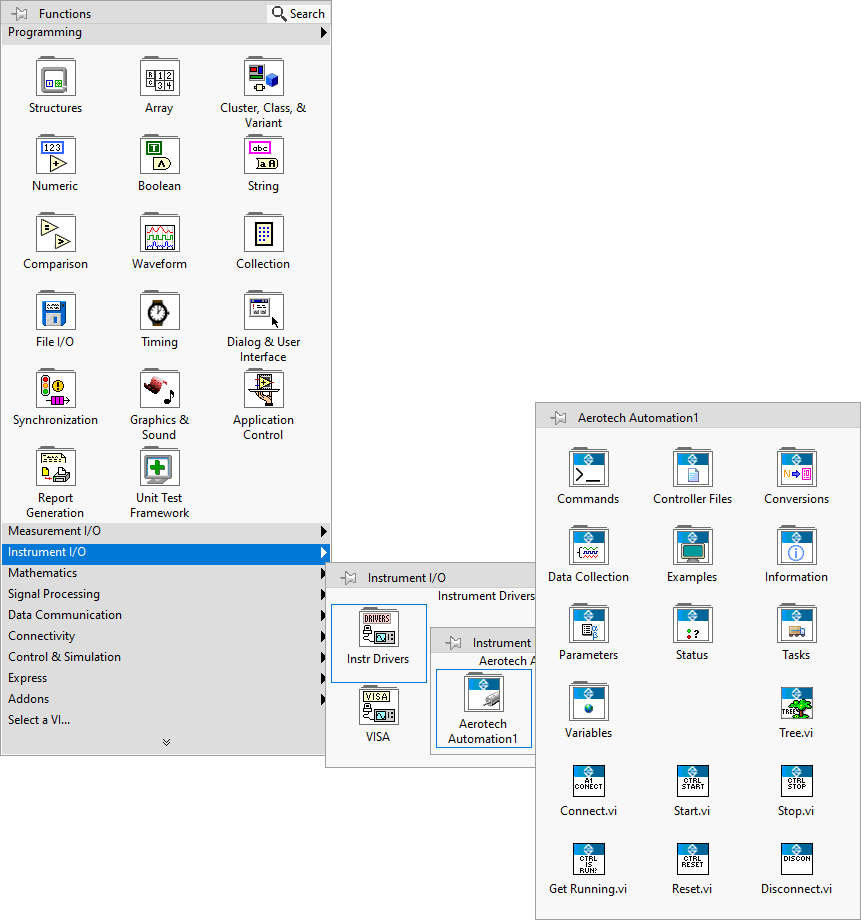
After you install the Automation1 Instrument Driver, it is available in the LabVIEW software. You can find the Instrument Driver on the Functions palette for block diagrams.
How to access the Automation1 Instrument Driver
- Start the LabVIEW software.
- Open the Functions palette on a block diagram.
- Navigate to Instrument I/O → Instr Drivers → Aerotech Automation1. All the Automation1 virtual instruments (VIs) are available on this palette.
- To interact with an Automation1 controller, drag the VIs from the Aerotech Automation1 palette to your block diagram.
Some example VIs (virtual instruments) are installed with the Automation1 Instrument Driver. These VIs are available on the Examples palette, which is under the Aerotech Automation1 palette. They demonstrate how to interact with an Automation1 controller through the Instrument Driver. They also show common features and use-cases in ways that are easy to understand.
Use the Automation1 Instrument Driver
After you install Automation1-MDK and the Automation1 Instrument Driver, the Instrument Driver becomes available in the LabVIEW software. You can find it on the Functions palette for block diagrams.
How to access the Automation1 Instrument Driver
- Start the LabVIEW software.
- Open the Functions palette on a block diagram.
- Navigate to Instrument I/O → Instr Drivers → Aerotech Automation1. All the Automation1 virtual instruments (VIs) are available on this palette.
- To interact with an Automation1 controller, drag the VIs from the Aerotech Automation1 palette to your block diagram.
The Automation1 Instrument Driver revolves around the Controller Refnum wire and the VIs (virtual instruments) on the Aerotech Automation1 palette. You can use these VIs to access all the controller features.
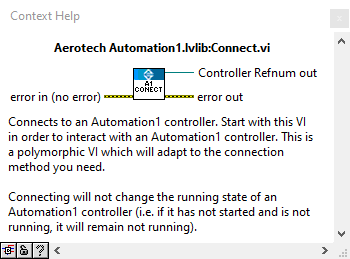
To get a Controller Refnum wire, you must connect to an Automation1 controller. Use the Connect.vi. Connect the error wire from one VI to the next VI in the sequence. See the Errors and Error Handling section of the Instrument Driver for LabVIEW™ Guidelines page for more information.

Principles of the Automation1 Instrument Driver
- Documentation
- In the LabVIEW software, you can access documentation for the Automation1 Instrument Driver through the Context Help dialog. On the main menu for a block diagram, click Help → Show Context Help. When you hover over an Aerotech Automation1 VI on a block diagram, the Context Help dialog shows you information about that VI.
- Virtual Instruments (VIs)
- After you install the LabVIEW software, the Automation1 Instrument Driver becomes available in it. You can find the Instrument Driver on the Functions palette for block diagrams. Open the Functions palette on a block diagram and navigate to Instrument I/O → Instr Drivers → Aerotech Automation1. All the Automation1 VIs are available on this palette. To interact with an Automation1 controller, drag the VIs from the Aerotech Automation1 palette to your block diagram.
- For more information about virtual instruments, see the VI and Function Reference section of the official LabVIEW™ product documentation.
- Connect to an Automation1 Controller
- A Controller Refnum wire is a connection to one Automation1 controller. Most Aerotech Automation1 virtual instruments (VIs) require a Controller Refnum wire as an input connection.
- Use the Connect.vi to connect to an Automation1 controller and to get a Controller Refnum wire from its output connection.
- You can connect to one or more Automation1 controllers at the same time in the same LabVIEW instance. You can also connect to the same Automation1 controller multiple times at the same time.
- When you connect an Automation1 controller, this process does not automatically start it. When you disconnect a controller, this process does not stop it.
- Features
- You can access all the controller features through the virtual instruments (VIs) on the Aerotech Automation1 palette.
- Status and Information Updates
- To get status and information updates, you must poll the controller. There are no events for errors and axis faults.
- Axes
- When you must specify an axis, you must use the axis name.
- Tasks
- When you must specify a task, you must use the task index.
Automation1 Example with LabVIEW Software
The example that follows shows you how to use the LabVIEW software with an Automation1 controller.
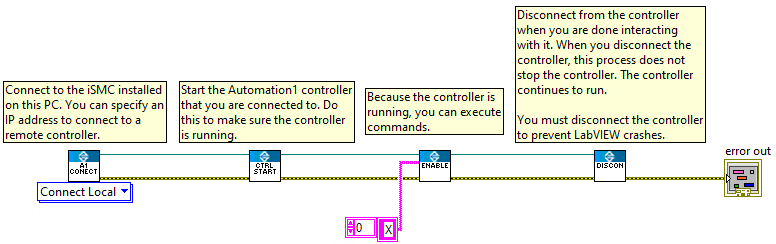
Figure: Connect to the Controller and Execute Commands


